Helm is practically a package manager for Kubernetes. If you are completely new to Helm, have a look at my previous tutorials.
- Practical Introduction to Helm: Day 21 of #100DaysOfKubernetes
- Manage Your Helm Chart with Helm Commands: Day 22 of #100DaysOfKubernetes
- Create a Helm Chart For YOUR Application: Day 23 of #100DaysOfKubernetes
There are lots of scenarios in which you would want to install multiple Helm Charts that are dependent on each other inside your Kubernetes cluster.
This could be done with Terraform modules — if you know Terraform — or through Helm sub-charts. Without those tools, you would end up installing one chart after the other, which is not that bad either but will take more time. Additionally, you would have multiple places where you would have to modify custom values.
In this tutorial, I will show you how you can install all the Helm Charts with a sub-chart instead of installing both charts individually.
Prerequisites
- Access to a running Kubernetes cluster
- Helm installed
The following commands should return a ‘valid’ output:
helm --version

kubectl get nodes

Let’s get started — create a Helm Chart
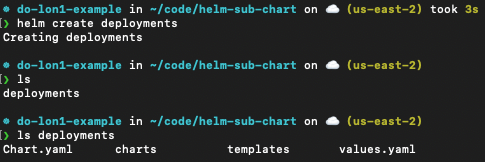
First, we are going to create a new Helm Chart. This can be done with the helm create command. We are going to run the following commands in an empty directory:
helm create deployments
This will create a basic nginx chart with the following directory structure:
- Chart.yaml
- charts
- templates
- values.yaml

Image Description: Helm Chart Directory structure
We are going to replace the image section of the values.yaml file with the following content i.e. our own container image:
image:
  repository: anaisurlichs/cns-website
  tag: 0.0.6
  pullPolicy: IfNotPresent
Next, we can install the Helm chart into our Kubernetes cluster just to make sure that it is working:
❯ helm install deployments ./deployments

NAME: deployments
LAST DEPLOYED: Mon Jul 25 15:01:44 2022
NAMESPACE: app
STATUS: deployed
REVISION: 1
TEST SUITE: None
NOTES:
1. Get the application URL by running these commands:
  export POD_NAME=$(kubectl get pods --namespace app -l "app.kubernetes.io/name=deployments,app.kubernetes.io/instance=deployments" -o jsonpath="{.items[0].metadata.name}")
  export CONTAINER_PORT=$(kubectl get pod --namespace app $POD_NAME -o jsonpath="{.spec.containers[0].ports[0].containerPort}")
  echo "Visit <http://127.0.0.1:8080> to use your application"
  kubectl --namespace app port-forward $POD_NAME 8080:$CONTAINER_PORT
Make sure that the application is working by port forwarding the app to the following port:
kubectl port-forward service/deployments 8080:80
And then, you can open localhost:8080 and view the application.
In the next section, we will define the Helm Charts we want to deploy alongside our existing deployment.
What is a sub-chart?
As far as I understood, there are two ways that you can declare and manage chart dependencies.
In either case, we will have to define the Chart dependencies in our Chart.yaml manifest of our main chart. This can be done by adding the following section:
dependencies:
- name: nginx
  version: "1.2.3"
  repository: "<https://example.com/charts>"
- name: memcached
  version: "3.2.1"
  repository: "<https://another.example.com/charts>"
The difference is that the repository could either refer to a remote chart repository, such as the one we use to store our Aqua Security Helm Charts, or it could refer to another directory that you have locally.
When would you use which option?
Generally, if the second Helm Chart that you want to install as dependency of your first chart is within a Helm Chart repository, I would always refer directly to the repository and then modify the values for the second Helm Chart in your main values.yaml file.
However, if you want to keep all the Helm Charts in one single directory && the additional Helm Charts that you want to install alongside your main Helm Chart are yours, then I would provide the file path inside the directory.
Creating a sub-charts for our Helm Chart
In this section, we want to add the trivy-operator charts as sub-charts to our existing deployments chart.
First, we will add a dependencies section to our existing Chart.yaml manifest:
dependencies:
    - name: trivy-operator
      version: "0.1.9"
      repository: "https://aquasecurity.github.io/helm-charts/"
Next, we have to add additional configurations for the trivy-operator helm chart to our Values.yaml manifest of the main Helm Chart:
trivy-operator:
  trivy:
    ignoreUnfixed: true
You can view additional configurations to the trivy-operator Helm Chart in the Values.yaml file and the Values.yaml manifest defined in this demo is available in the GitHub repository for this blog post:
To have access to all of our Chart dependencies, we have to run helm dependency build <directory with our Helm Chart> like shown below:
helm dependency build ./deployments
This command will populate our charts directory:

Additionally, I would recommend updating the Chart dependencies every time before you install or update an existing installation:
helm dependency update ./deployments
Lastly, we can go ahead and re-deploy our deployments chart to our Kubernetes cluster — this time with our Chart dependencies:
helm upgrade --install deployments ./deployments
Once installed, have a look at the monitoring namespace inside your Kubernetes cluster. There, you should find all of the resources installed by the Helm Chart.
Shortcomings of the Helm-sub-charts
Helm sub-charts work well when the Charts you want to deploy are used in combination with each other but are not directly dependent on each other's resources.
For instance, to deploy the Trivy Kubernetes operator with the Servicemonitor enabled to your cluster, you need to have Prometheus running already. If Prometheus is not running, then Helm cannot install the Trivy Operator because some CRDs that it needs are not yet in the cluster.
Currently, I have not found a good workaround to specify an order in which Helm Charts should be deployed. If you are using your own Helm Charts, you can add finalisers to your deployments. However, this does not seem like a good option for Helm Charts that aren't yours but that you are deploying from an external registry.
If you are in a situation where you need to install multiple Helm Charts that are dependent on a specific order, I would really suggest using Terraform since Terraform configurations provide you with more control over those aspects.
Commands used with Chart dependencies
This section details some useful commands that can be used to manage Helm Chart dependencies.
helm dependency update CHART [flags]
The helm dependency update command has two main functions. First, it is responsible to verify that the Charts specified in the Chart.yaml file are present in the ./chart directory at a valid version. It then pulls the dependency as specified in the Chart.yaml manifest. This includes updates to the charts. A Chart.lock file will then contain the most recent specifications of the chart.
helm dependency build CHART [flags]
This command builds the ./chart directory based on what is specified in the Chart.lock file. If there is no Chart.lock file present, this command will “re-negotiate” dependencies between the Helm Charts, similar to the helm dependency update command.
helm dependency list CHART [flags]
This command will load the chart and list all the dependencies within.
What’s next?
I hope that this blog post offered a good introduction to Helm sub-charts.
Please let me know if you have any questions in the comments section of the YouTube video.
I would highly appreciate if you could give it a like 👍🏼🎉

