The other week, I gave a presentation at a Platform Engineering meetup on getting started with security scanning using open-source tools. The presentation focused on Trivy, an all-in-one, open source security scanner by Aqua Security. Disclaimer: I work in the open source team at Aqua Security.
After the talk, someone came up to me and asked:
This is a great question. The short answer is that Trivy can access the container image from the container registry in which it is stored. Once it has the image, it can analyse the container image layers and access the directories and files added to each layer. This information is then used for security scanning.
However, the longer answer requires a bit more information on container images, what they actually are, and how they work. This, and more, will be covered in this blog post.
Containers and Container Image Layers
When discussing containers, we must distinguish between running containers and container images. Container Images can be used to run containers. They are the image of the container until they are run – think "docker run <container image>". This becomes a running container.
What are running containers?
Running containers are just Linux processes. You create a new Linux process whenever you start a new container. The container runtime, such as Runc, Docker, Podman, etc., will then use existing Linux features to provide isolation between the new Linux process from the container and existing processes running on the host.
Below is an example of starting a new container on a Linux host, then seeing its process ID and creating a new file in the container's filesystem:
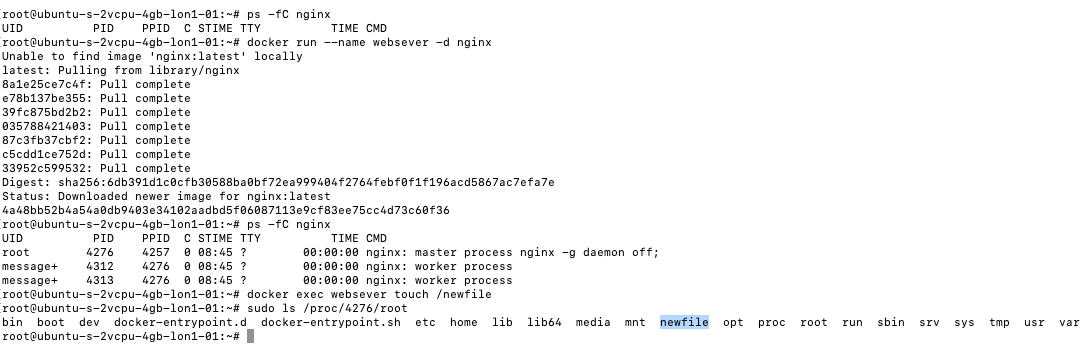
The example has been taken from the following video tutorial by Rory McCune.
Once you start a new container on a Linux host, you can interact with it like with any other process. So, generally, it's easier to understand how a security scanner, such as Trivy, might access information about a running container rather than the container image. However, this is not how Trivy/container security scanners work. Trivy does not scan the running container but the container image, which is an important distinction. Users don't have to run the image to scan it for security issues such as Vulnerabilities.
The following sections will explain how this is made possible.
Container Image Layers
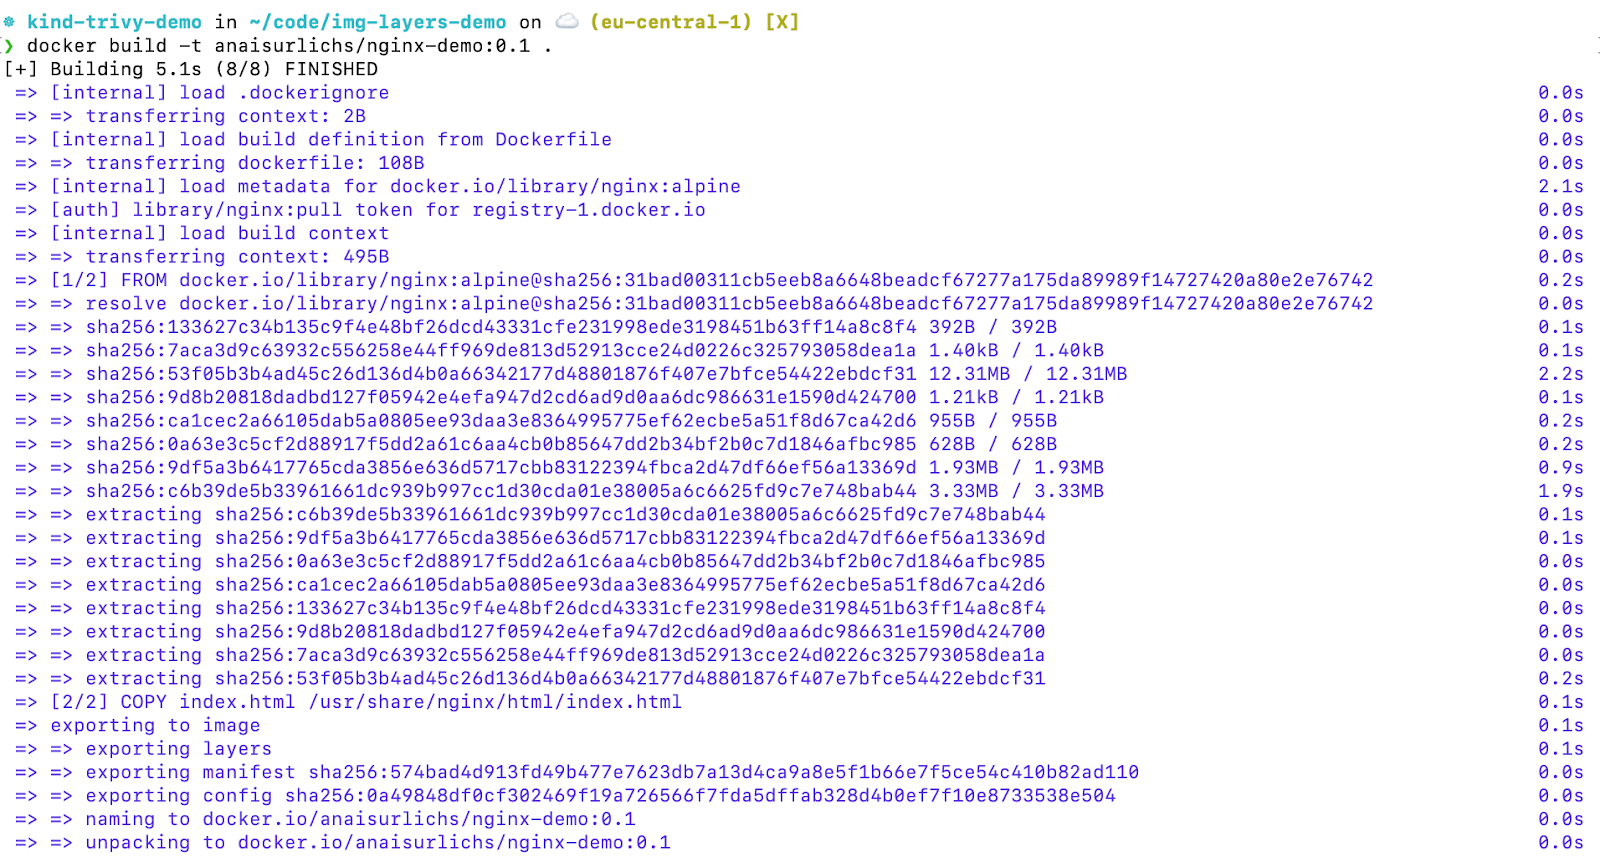
Every single container image consists of zero, one or multiple layers. Each layer in a container image corresponds to a command in the Dockerfile. Look at the example Dockerfile below:
FROM nginx:alpine
COPY index.html /usr/share/nginx/html/index.html
This Dockerfile has just two commands: FROM, which specifies the base image that will be used, and COPY, which copies the index.html file into the base nginx image filesystem. The commands are executed when the container image is built. Each command in the Dockerfile creates a new layer for the container image. A layer is basically a directory that stores the information on the layer. When you build a new container image, Docker and other containerisation tools will display the different layers, each consisting of its own files. A unique ID references the layer.
You can look at the different image layers through the docker history command:
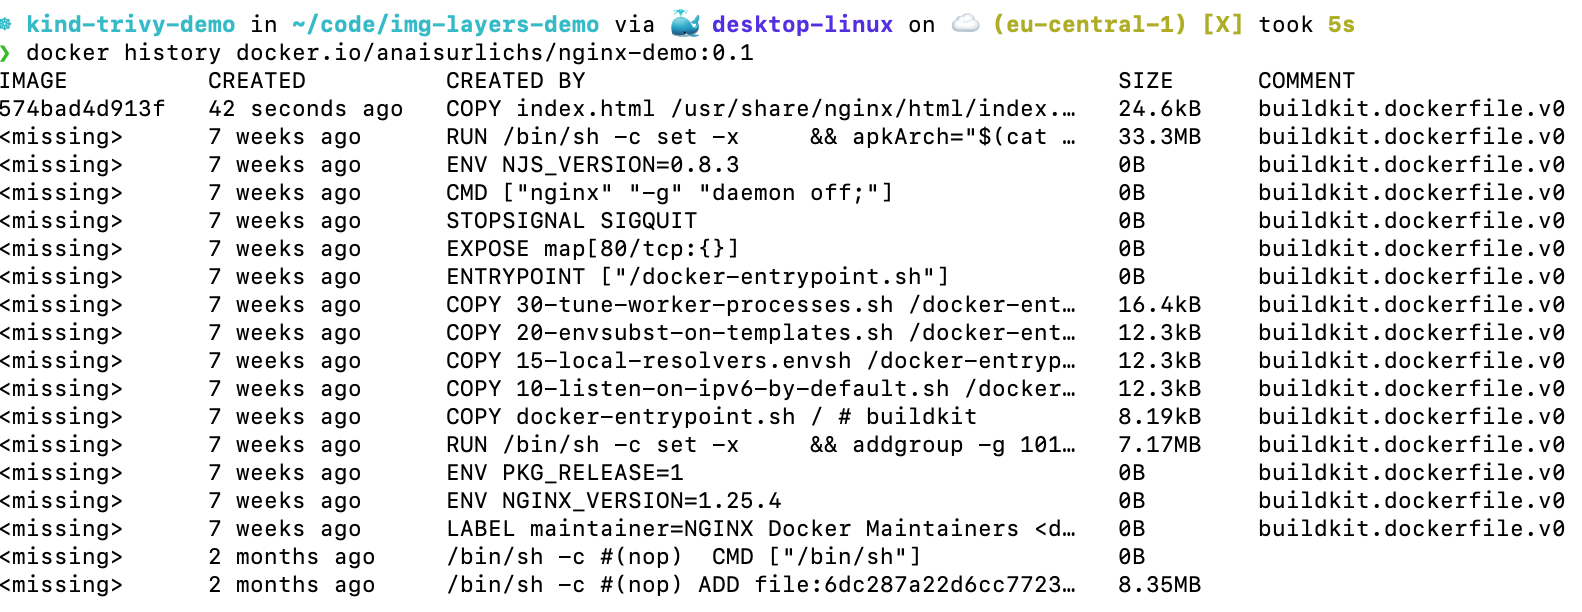
This will show you the different layers in the container image. This is also part of the information that Trivy will use to analyse and scan your container image.
There is a difference between the preceding layers and the current layer. The topmost layer is called the current layer. In this case, it is referenced by the IMAGE layer ID of 574bad4d913f. Until the container image is run, all of the layers are read-only. The container runtime will then add a writable layer on top of the existing layers.
The above image shows that the size of all instructions other than the RUN and COPY commands is SIZE 0. This is expected as only the RUN and COPY commands from the Dockerfile contribute to the size of the Docker image. How cool is that?
Additional information on the container image is provided through the configuration file, which can be viewed through docker inspect:
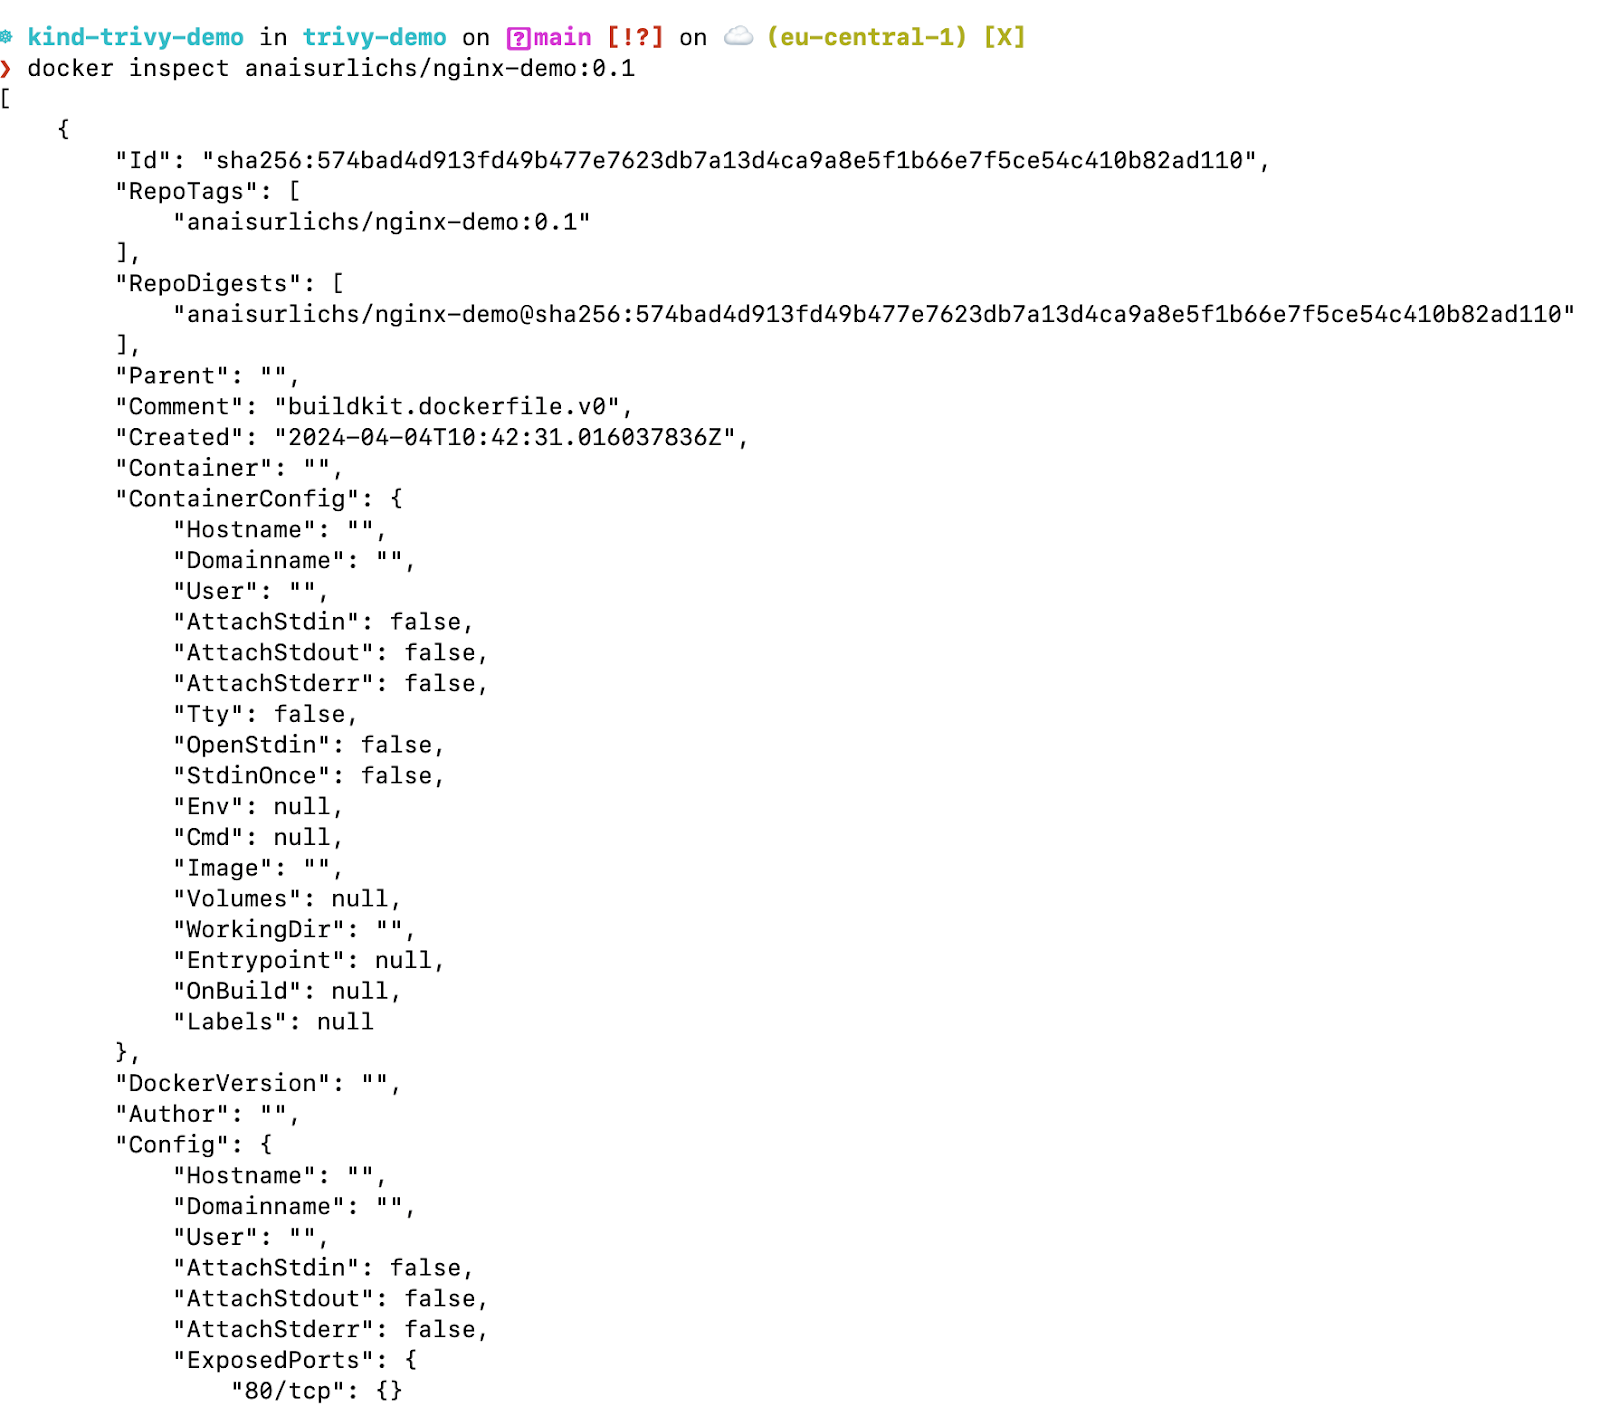
This file provides information on the environment, metadata, and layers that comprise the container image.
Both the information from the container image layers and the image configuration file are used to scan the container image for security issues.
Where are the layers stored?
In the previous section, I mentioned that each layer is a directory. The files in that directory can be viewed on the host machine.
Depending on the Operating System you are using, and the containerisation tool, Docker will store the container image layers at different locations. By running docker info, you can get the information about the storage drivers and docker root directory:

However, in the case of Mac, this doesn't work. If you want to read more about it, here is a good article by freeCodeCamp. Other locations are specified as follows:
- Ubuntu: /var/lib/docker/
- Fedora: /var/lib/docker/
- Debian: /var/lib/docker/
- Windows: C:\ProgramData\DockerDesktop
- MacOS: ~/Library/Containers/com.docker.docker/Data/vms/0/
Once you know where docker stores the image resources, you can view the respective filesystem for each container:

Additionally, you can access all of the image layers under /var/lib/docker/overlay:

Each layer will contain specific files and directories for that layer. For instance, we can look at the current/top-most layer of our nginx image and find our newfile that we created in the previous section:

Even when we stop the running container, our file will still be in the layer; it does not matter whether the container is running or not. This is important for security scanning.

Bonus information for those who want a deep dive:
You might have noticed the name of the directory in which the image layers are stored “overlay2”. This is not just any name but an implementation of a union filesystem, also called union mount and the default implementation used by docker. You can read more about it in the following blog: https://martinheinz.dev/blog/44
Benefits of Container Image Layers
One of the main benefits of layers is that they can be reused across container images. If layer 4 for one container is exactly the same as layer 3 for another container, then the layer can be used for both. The two main benefits are that it will be faster to build new container images and that it will save disk space.
Image Layers and OCI specification
Most container images follow the Open Container Initiative (OCI) specification. OCI specifies how container images should be built, run, and distributed/stored. Building OCI-compliant artefacts, such as container images, is important for usability and security. If we all follow the same standard, we can agree on best practices and tooling that integrate with all of our shared resources, e.g., container image scanning.
Trivy can scan all container images and other artefacts that are OCI compliant. The OCI specification is composed of three different types of specification – the Runtime Specification (runtime-spec), the Image Specification (image-spec) and the Distribution Specification (distribution-spec). The Image Specification is particularly important for container image scanning. To elaborate further, the following abstract is taken from the OCI spec:
Ultimately, every container image is just a fancy tarball consisting of directories, metadata, and libraries that define how the image is built and tell a container runtime how to run it.
Both gzip and zstd represent a media payload. Once decompressed, Trivy will be able to scan it. More information on the image layer filesystem that is supported and can be scanned by Trivy is provided in the following documentation.
Since every OCI-compliant container image follows the same standards, Trivy can codify how to unpack and analyse the packages in a container image. This is done by accessing the different image layers discussed earlier. Trivy will use the container image's filesystem and configuration file to analyse and scan each layer.
Trivy vulnerability scanning
Vulnerability scanning is one of Trivy's various security scanners
This blog post focuses on Vulnerability scanning for Container Images. For more information on the other scanners, installation instructions, and more, please head over to the Trivy documentation.
Using a Docker engine
Trivy looks for the specified image in your local Docker Engine or other container runtime. It will be skipped if Docker Engine or other container runtime is not running locally.
Without a Docker engine
If Trivy does not find a docker client on the machine, it can still access the container image and analyse and scan it. This is done in the following four steps:
1. Pull layers (and image manifest and config)
- HTTP access with the OCI distribution spec as mentioned above
2. Analyze layers
- Extract tar files and traverse files to detect installed packages
- Store analysis results per layer in the cache
3. Merge analysis results
- A package can be updated or deleted in upper layers. We need to merge the above results according to the overlay spec.
- Storing results per layer is important as we can skip analyzing layers stored in the cache)
4. Scan packages for vulnerabilities
Once Trivy has checked all the installed packages, it will produce a scan report with the identified vulnerabilities. The scan report could look similar to the following in the case of our previous container image; there are no identified security issues.
anaisurlichs/nginx-demo:0.1 (alpine 3.18.6)

Total: 0 (UNKNOWN: 0, LOW: 0, MEDIUM: 0, HIGH: 0, CRITICAL: 0)
A more detailed vulnerability report would look similar to the following, scanning a basic nodejs application:
trivy image anaisurlichs/cns-website:0.2.4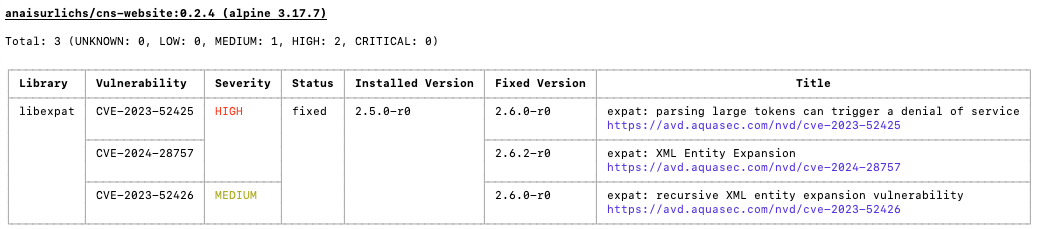
Additional Resources
Here is an amazing playlist (13 videos at the time of writing this blog post) by Rory McCune that I highly recommend to get started learning more about what containers are and how they are built:
Additionally, if you would like to learn more about isolation between processes on a Linux host i.e. running containers, have a look at the following content:
- Julia Evans: What even is a container: namespaces and groups
- What are container runtimes?
- What is a container image?
- 4 Linux technologies fundamental to containers
Summarising
This blog post introduced container image layers and how they are used to analyse the packages installed for security scanning.
If you have any questions, please reach out on the Aqua Security Slack.