Introduction to Dagger
Dagger is a programmable application delivery platform that runs your CI/CD pipeline in containers. Users define their CI/CD pipeline as code, in the same language as the application that will run in the pipeline.
By defining CI/CD processes through code, they can be run in any pipeline independent of the provider. Whether you are using GitLab CI/CD, GitHub Actions, Codefresh, or CircleCI, ultimately, the pipeline is just used to run the Dagger code. This makes it very easy to move Dagger pipelines between CI/CD providers.
This blog post is divided into two main parts. The first one details what Dagger is, how it works, and the main benefits of using Dagger. The second part provides a tutorial that you can follow to get started with Dagger and understanding its benefits.
Dagger Overview
The source code is open source and Dagger provides free and managed solutions for their enterprise platform.
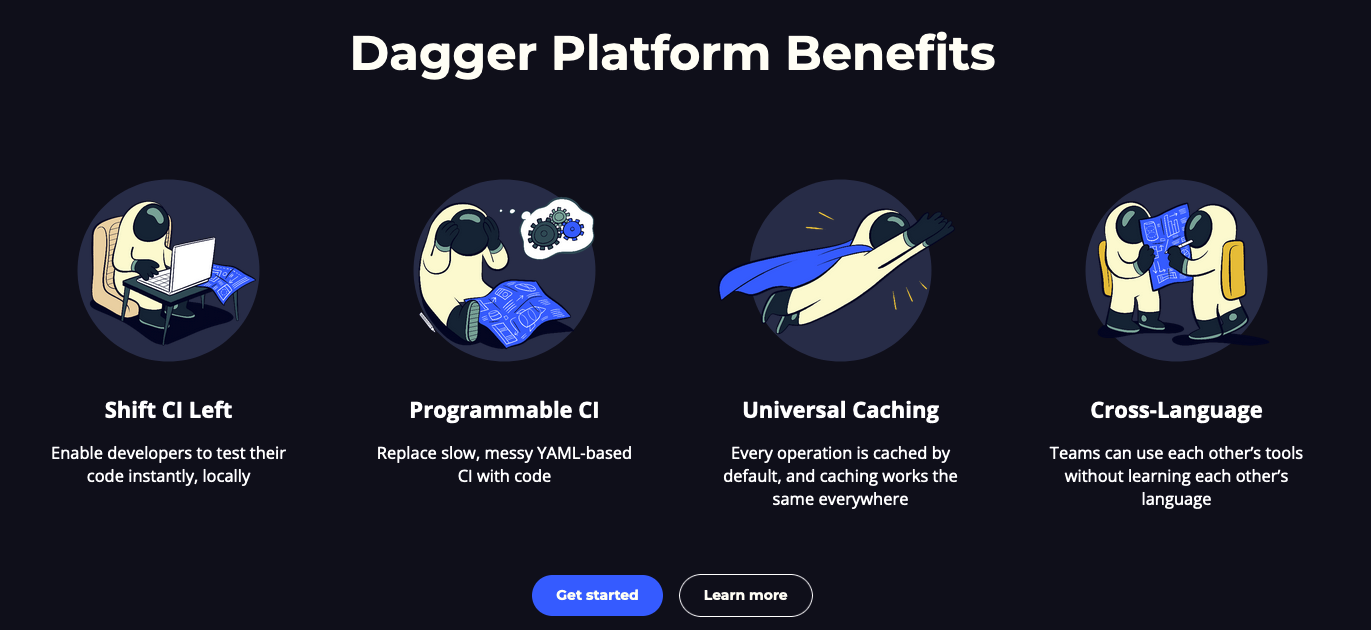
The main platform benefits include the following:
- Shift CI Left
- Programmable CI
- Universal Caching
- Cross-Language support
Benefits to app teams
The following content is taken from the Dagger GitHub Repository.
- Reduce complexity: even complex builds can be expressed as a few simple functions
- No more "push and pray": everything CI can do, your dev environment can do too
- Use the same language to develop your app and its scripts
- Easy onboarding of new developers: if you can build, test and deploy - they can too.
- Everything is cached by default: expect 2x to 10x speedups
- Parity between dev and CI environments
- Cross-team collaboration: reuse another team's workflows without learning their stack
Benefits to platform teams
- Reduce CI lock-in. Dagger functions run on all major CI platforms - no proprietary DSL needed.
- Don't be a bottleneck. Let app teams write their functions. Enable standardisation by providing a library of reusable components.
- Faster CI runs. CI pipelines that are "Daggerized" typically run 2x to 10x faster, thanks to caching and concurrency. This means developers waste less time waiting for CI, and users spend less money on CI computing.
- A viable platform strategy. App teams need flexibility and control. Dagger provides users with a way to reconcile the two, in an incremental way that leverages the stack you already have.
How does Dagger Work?
The following Graphic has been taken from the Dagger documentation.
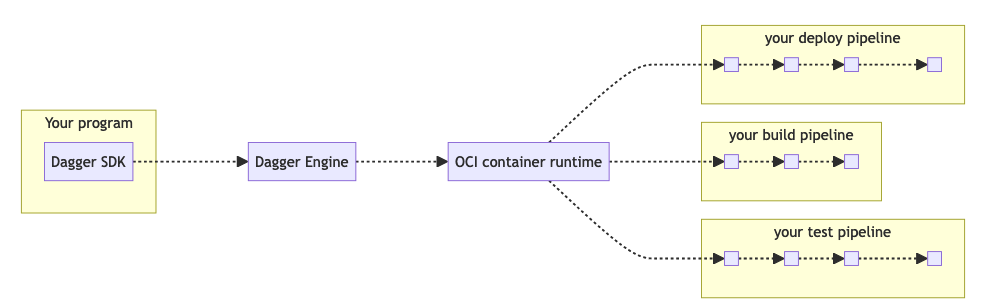
When developers use Dagger, they are setting up CI pipelines through the Dagger SDK. SDK stands for System Developer Kit. When you set up and use the SDK, the program will open a new session with the Dagger Engine – this is a new container running on your host machine. If your setup already has a Dagger Engine available, it will use the existing one. Otherwise, triggering a program through the SDK will set up a new session with the Dagger Engine.
Developers specify in their program API requests through the SDK. The API requests are then run through a pipeline in the Dagger Engine. Once the Engine receives an API request, it will do some magic to set up a Directed Acrylic Graph (DAG) that defines the different processes in the pipeline. The Dagger Engine then starts to process operations concurrently.
Don’t worry too much about what a DAG is, it’s a way to describe the relationship between different processes.
The result of one pipeline might be used as input in another pipeline. A pipeline is described as “a module” in Dagger.
Daggers Caching Functionality
Dagger highlights across its resources that it has very advanced caching functionality. Users have to set up a volume as part of the pipeline. This volume is used by Dagger to persist the data between pipeline runs. Resulting, once the user has run a pipeline, Dagger will only rerun processes that include changes to the pipeline and related resources.
Prerequisites
Install the Dagger CLI locally. There are multiple different installation options listed in the documentation. We are going to use Homebrew:
brew install dagger/tap/daggerEnsure that everything is working by running the following command:
dagger --helpGetting Started with Dagger Tutorial – Part 1
In this section, we are going to use Dagger to build a remote git repository locally and scan it for vulnerabilities with the Trivy plugin.
First, create a new directory:
mkdir dagger-exampleAnd change into that directory:
cd dagger-exampleCreate a new script called build.sh:
touch build.shNext, pass the following code into the build.sh script:
#!/bin/bash


# get Go examples source code repository
source=$(dagger query <<EOF | jq -r .git.branch.tree.id
{
git(url:"https://go.googlesource.com/example") {
  branch(name:"master") {
    tree {
      id
    }
  }
}
}
EOF
)


# mount source code repository in golang container
# build Go binary
# export binary from container to host filesystem
build=$(dagger query <<EOF | jq -r .container.from.withDirectory.withWorkdir.withExec.file.export
{
container {
  from(address:"golang:latest") {
    withDirectory(path:"/src", directory:"$source") {
      withWorkdir(path:"/src/hello") {
        withExec(args:["env", "GOOS=darwin", "GOARCH=arm64", "go", "build", "-o", "dagger-builds-hello", "."]) {
          file(path:"./dagger-builds-hello") {
            export(path:"./dagger-builds-hello")
          }
        }
      }
    }
  }
}
}
EOF
)


# check build result and display message
if [ "$build" == "true" ]
then
  echo "Build successful"
else
  echo "Build unsuccessful"
fi
In the first part, we request the go repository and in the second query, we build the project inside the goland:latest container. You can read more about the process in the documentation.
In the scripts, we make direct use of GraphQL API queries. This is one of the magic points behind Dagger. We/They can translate the GraphQL API queries into different SDKs. We will use the Go SDK in the next section of this blog.
getting-started tutorial for building a custom client.
Run the pipeline, use the following command:
dagger run ./build.shNow the go application will be available in your current working directory. Run the application:
chmod +x ./dagger-builds-hello
./dagger-builds-hello
This should provide the following output:

Important
The Dagger documentation provides further examples of running different types of API Queries for the script.
Using the Dagger Go SDK – Part 2
In this section, we are going to make use of the following tutorial.
Copy the files or clone our example repository:
git clone https://github.com/Cloud-Native-Security/dagger-trivyChange into the app directory:
cd appIf you are using another repository than the one above, initialise the go directory:
go mod init <Github repo>


go mod init github.com/Cloud-Native-Security/dagger-trivy/app
Replace the GitHub path with your repository path.
Next, add the dagger module:
go get dagger.io/dagger@latestAdd Trivy vulnerability scanning
Trivy is an all-in-one cloud native security scanner. This section showcases how you can add the Trivy module to scan container image for vulnerabilities in Dagger.
First, run the following command to initialise a module:
dagger init --name=example --sdk=goNote: At this stage, please ensure that you do not set the --name flag to Trivy.
Also, if the command does not run as expected, here is what you can do to resolve it:
- If your go version in your go.mod file has a minor version, remove the minor version: go 1.21.6 becomes go 1.21
Next, in the app directory, we need to install the Trivy integration from the page in Daggerverse:
dagger install github.com/jpadams/daggerverse/trivyThe dagger module will be set up in your directory as a main.go file. This is what dagger calls a Dagger module.
Modify the existing pipeline
We are going to replace the content in the main.go file added by Dagger with the following content:
package main

import (
	"context"
	"fmt"
)

type Example struct{}

const (
	trivyImageTag = "0.49.1" // semver tag or "latest"
)

// example usage: "dagger call container-echo --string-arg yo"
func (m *Example) ContainerEcho(stringArg string) *Container {
	return dag.Container().From("alpine:latest").WithExec([]string{"echo", stringArg})
}

// example usage: "dagger call grep-dir --directory-arg . --pattern GrepDir"
func (m *Example) GrepDir(ctx context.Context, directoryArg *Directory, pattern string) (string, error) {
	return dag.Container().
		From("alpine:latest").
		WithMountedDirectory("/mnt", directoryArg).
		WithWorkdir("/mnt").
		WithExec([]string{"grep", "-R", pattern, "."}).
		Stdout(ctx)
}

func (m *Example) Build(ctx context.Context, src *Directory) *Directory {

	// get `golang` image
	golang := dag.Container().From("golang:latest")

	// mount cloned repository into `golang` image
	golang = golang.WithDirectory("/src", src).WithWorkdir("/src")

	// define the application build command
	path := "build/"
	golang = golang.WithExec([]string{"env", "GOOS=darwin", "GOARCH=arm64", "go", "build", "-o", path, "./src/hello.go"})

	scanResult, err := dag.Trivy().ScanContainer(ctx, golang, TrivyScanContainerOpts{
		TrivyImageTag: trivyImageTag,
		Severity:      "HIGH,CRITICAL",
		Format:        "table",
		ExitCode:      0,
	})

	fmt.Println(scanResult)

	if err != nil {
		return nil
	}

	// get reference to build output directory in container
	outputDir := golang.Directory(path)

	return outputDir
}
Next, build and run this pipeline:
dagger --focus=false call build --src ./ export --path ./build-two --progress plain
In this case, we are asking Dagger for the entire output through --focus=false, provide the source code that we want to use in the build pipeline --src ./ and export from the Dagger Engine the build path.
In the terminal, you should now see the Trivy scan result:

If successful, the command should have created a new build directory with a dagger-trivy binary that will run our hello world example:
./build/hello
Hello, world!
Additional Resources
Viktor Farcic published the following tutorial in which he stated “you should ditch pipelines almost entirely”
https://youtu.be/oosQ3z_9UEM?si=gv7ZHbxrVn-9V-Sr
Here is an introduction to Dagger by the Dagger team:
https://youtu.be/HHhttaiHtm4?si=j2qKuut7zVlfN2Fr
What’s next?
This blog post detailed the benefits of Dagger and how you can get started with Dagger and its Go SDK. I highly encourage you to try out some of the other Dagger functionality and integrations.
⭐If you enjoy Trivy, please give the repository a star on GitHub ⭐