When you are the only one using a Kubernetes cluster, you likely haven’t had the need yet to look into and implement a systematic approach to authorising users. However, once your team grows and you have multiple people accessing the same cluster, it is time to look into RBAC. (I mean, you should look into RBAC either way but the time for most people to start learning about it is likely when collaborating across team members.)
In this blog post, we will
- Look at RBAC, what it is and how it can be used
- Create a ServiceAccount for a user called Bob, who has restricted rights inside our cluster
- Create a Role and ClusterRole to allow a user Alice to just access an application namespace
What is RBAC?
RBAC stands for Role-Based Access Control; it allows us to define user privileges i.e. who is able to access which type of Kubernetes resources. Through RBAC we can define different access rights such as who is allowed to access and use or even modify or delete the resource. “Because Kubernetes RBAC is REST-based, it maps HTTP verbs to permissions. For example, POST is mapped to the create right.” Source
RBAC is enabled in your cluster by default.
Why do we need it?
- Making our cluster more secure
- Allowing more members within our organisation to view our Kubernetes resources, can be beneficial for customer support use cases since team members are not dependent on the main cluster-admin to view resources.
- Preparing us to scale our cluster use and our team — The sooner we implement it, the better we will be prepared for future use cases.
Disadvantages of using RBAC
To be honest, you will not get around implementing RBAC and defining custom rules in Kubernernetes for different users. It is one of those things that can either make your cluster more secure or if ignored, less secure.
However, some of the disadvantages include that your cluster and the access control within your cluster can get complex to manage pretty quickly.
To prevent this, the main recommendation is to give users the least privileges they need to get the job done.
Lastly, Kubernetes RBAC control tends to be quite broad; it can reference the access to “pods, logs, ingress controllers, or any other type of custom resource you choose to define.” Source.
How does it work?
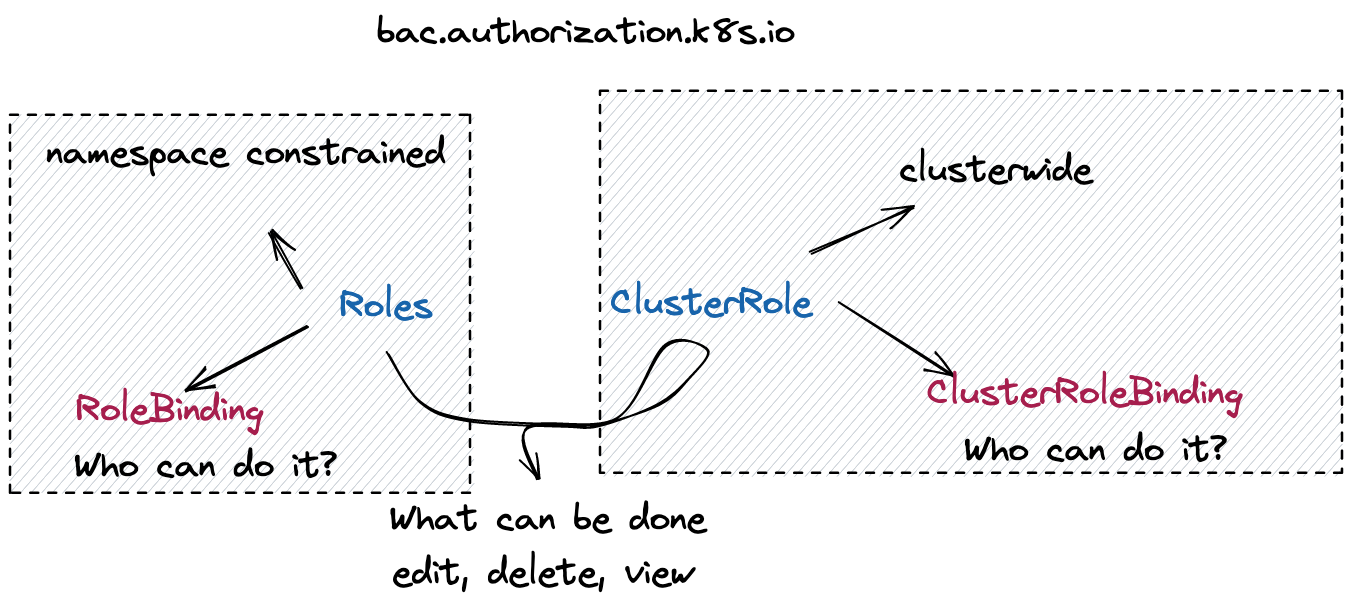
Kubernetes objects are defined through different API specifications. RBAC is part of the rbac.authorization.k8s.ioAPI group — this group references four different types of Kubernetes objects.
<aside> ✨ Just a quick reminder: When we define Kubernetes manifests, we define at the beginning of the YAML file what kind of object the manifest is going to be. For instance, Deployment or Service are each Kubernetes objects that are defined through an API.
</aside>
In the case of the RBAC API, we can reference four different types of Kubernetes objects, namely: Role, ClusterRole, RoleBinding, and ClusterRoleBinding.
Role and ClusterRole define WHAT can be done vs RoleBinding and ClusterRoleBinding define WHO can do it.
A lot of times, when we set up Custom Resources in our Kubernetes cluster to use an application (think about ArgoCD or Crossplane), they come installed with RBAC resources that allow them to handle different resources within our cluster.
Here is an example of a “Role” resource:
apiVersion: rbac.authorization.k8s.io/v1
kind: Role
metadata:
  namespace: default
  name: pod-reader
rules:
- apiGroups: [""] # "" indicates the core API group
  resources: ["pods"]
  verbs: ["get", "watch", "list"]
Source: This has been taken from the following blog post.
Furthermore, Kubernetes RBAC differentiates between human resources and software resources. User Accounts manage the access rights for users, while Service Accounts manage the access rights for software resources.
What is the difference between Role and ClusterRole
ClusterRole would be applied to the entire cluster while Role can be constrained to specific namespaces. This makes it possible to allow users to only access specific namespaces and be granted different permissions within the namespace. On the other hand, ClusterRole allows you to constrain access to resources that are cluster-wide, such as nodes. Additionally, ClusterRole is also used for Non-resource REST Endpoints such as /healthz.
“Default ClusterRole:
cluster-admin: Cluster-wide superuser.admin: Full access within a Namespace.edit: Read/write within a Namespace.view: Read-only within a Namespace.”
Source: This has been taken from the following blog post. I highly suggest having a look at the blog post for more details.
Other tips
- Kubernetes comes with default Service Accounts. These can be used to assign permissions to users. However, this is not the best practice. Instead, set up your own Service Accounts.
- Continuously update your RBAC permissions. If you are setting up new Kubernetes resources or modifying existing resources a lot, the chances are high that you should be reviewing and updating your RBAC permissions at the same pace. “It’s a best practice to ensure that whenever you create, remove, or update the permissions of any user or service account, or when you create a namespace or pods, you also modify or delete all RBAC policies associated with that entity. This can be somewhat tedious, given that Kubernetes has multiple types of files associated with RBAC (Roles, RoleBindings, ClusterRoles, and ClusterRoleBindings). Still, it’s important to make RBAC policy updates a systematic and continuous part of Kubernetes management.” Source
Let’s get practical
In my case, I am going to use a Kubernetes cluster running through microk8s. You can find the installation options here. You can use other Kubernetes clusters, just make sure that they have RBAC enabled.
RBAC is part of Kubernetes since release 1.6, in most Kubernetes clusters, it is enabled by default. To check whether it is enabled in your cluster, “look for an RBAC configuration file in /etc/kubernetes/manifests on your master node(s) or the Kubernetes API server pod, and make sure it contains the flag”:
--authorization-mode=Node,RBAC
At least this is the suggestion that you will find in most blog posts — in most managed clusters you would not even be able to access this information through the master node. Since I am using Kubernetes, I never had to look up something like this. So let’s just assume it is enabled and move on.
MicroK8s tells you how to enable RBAC in the documentation. This can be done through the following command:
microk8s enable rbac
However, in many cases it could have been already enabled by default.
First steps
First, you will have to create a Role or a ClusterRole and then connect it to a RoleBinding to the Role or the ClusterRoleBinding to the ClusterRole.
Like with many Kubernetes resources, you can either create them manually via kubectl commands or you can create a YAML file for that resources. I would always recommend the latter approach because this will allow you to define your access rights declaratively. This will allow you to have a file for every resource in your cluster. In comparison, if you are using kubectl commands, you will have to access the resource within your cluster and make modifications through an imperative approach.
Think about it this way, through the declarative approach, you already know how your resources are supposed to look like in the end. It is like cooking by recipe, you already know which ingredients are supposed to go into the mix and how the final dish is supposed to look like. In comparison, through the imperative approach, you would widely mix ingredients together, not knowing what the end-state is supposed to be until you have something that resembles how you have envisioned the final dish.
Creating a new User through Service Accounts
There are multiple different ways that you can create a new user with specific access rights. The proper way is doing it through k8s CSR. However, you can also do it through openssl or in this first example through ServiceAccounts. Note that ServiceAccounts are usually meant for workloads and not users.
For this example, we are going to use the following kubectl plug in: https://github.com/superbrothers/kubectl-view-serviceaccount-kubeconfig-plugin
And run the following commands to create a new ServiceAccount and according role and rolebinding.
kubectl create serviceaccount

kubectl create clusterrole bob --verb=get,list,watch,create,update --resource=pods,pods/status,namespaces,deployments

kubectl create clusterrolebinding bob-binding --clusterrole=bob --serviceaccount=default:bob

kubectl view-serviceaccount-kubeconfig bob > ~/.kube/testkubeconfig

export KUBECONFIG=~/.kube/testkubeconfig
Now we can access the cluster as bob. You can see that he is unable to delete pods.
This can be checked through a simple nginx deployment:
apiVersion: apps/v1
kind: Deployment
metadata:
  name: nginx-deployment
  namespace: bob
spec:
  selector:
    matchLabels:
      app: nginx
  replicas: 2
  template:
    metadata:
      labels:
        app: nginx
    spec:
      containers:
      - name: nginx
        image: nginx:1.14.2
        ports:
        - containerPort: 80
kubectl apply -f deployment.yaml -n bobNow try to create, edit and delete that deployment through the Bob account.
Creating a new user and permissions through User-Role-Binding
In this example, we are going to create a new user an giving that user access to just a specific namespace.
First, we will create the namespace. Here is the YAML that we are going to use:
apiVersion: v1
kind: Namespace
metadata:
  name: application
  labels:
    name: alice
Then we can apply the resource through:
kubectl apply -f namespace.yaml
Next we will create a Role that defines what the user can do within the namespace:
apiVersion: rbac.authorization.k8s.io/v1
kind: Role
metadata:
  namespace: application
  name: alice
rules:
- apiGroups: [""] # "" indicates the core API group
  resources: ["pods"]
  verbs: ["get", "watch", "list"]
We appy the Role to our cluster:
kubectl apply -f role.yaml
And then bind the Role to a Rolebinding with the following command:
kubectl create rolebinding alice --role alice --user alice -n application
This created a RoleBinding automatically for us. We can view our Role and our RoleBinding either through the following commands:
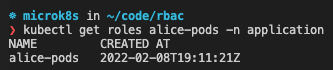
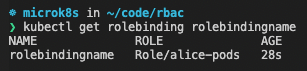
Or we look up both resources through K9s

To complete this exercise, we would have to create a new user. In Kubernetes, there are lots of different options for creating new users. Have a look at the documentation.
Note that this part is based on the following blog post and largely copied from it: https://docs.bitnami.com/tutorials/configure-rbac-in-your-kubernetes-cluster/
Create a private key for your user. In this example, we will name the file alice.key:
openssl genrsa -out alice.key 2048
Create a certificate sign request alice.csr using the private key you just created (alice.key in this example). Make sure you specify your username and group in the subj section (CN is for the username and O for the group). As previously mentioned, we will use alice as the name and user as the group:
openssl req -new -key alice.key -out alice.csr -subj "/CN=alice/O=user"
Locate your Kubernetes cluster certificate authority (CA). This will be responsible for approving the request and generating the necessary certificate to access the cluster API. Its location is normally /etc/kubernetes/pki/. In the case of Minikube, it would be ~/.minikube/. Check that the files ca.crt and ca.key exist in the location. In the case of microk8s, the CA will be inside of the multipass VM folder, which you can access through the following command:
multipass shell microk8s-vm
Next, it should be under the following path: cd /var/snap/microk8s/current/creds
Note that you might have to run the following command to access the directory: sudo su
Take the certs and copy them to an accessible location e.g. within your .kube directory.
Generate the final certificate alice.crt by approving the certificate sign request, alice.csr, you made earlier. Make sure you substitute the path to the ca.crt and ca.key to wherever you put those. In this example, the certificate will be valid for 500 days:
openssl x509 -req -in alice.csr -CA ca.crt -CAkey ca.key \\
-CAcreateserial -out alice.crt -days 10000
Save both alice.crt and alice.key in a safe location.
Add a new context with the new credentials for your Kubernetes cluster. This example is for a Minikube cluster but it should be similar for others:
kubectl config set-credentials alice --client-certificate=./alice.crt  --client-key=alice.key

kubectl config set-context alice-context --cluster=microk8s-cluster --namespace=default --user=alice
Now you can access the application namespace through this user:
kubectl --context=alice-context get pods -n application
Additional Resources
For more examples on ClusterRole, Roles and the according ClusterRoleBinding and RoleBinding, have a look at these blog posts:
- https://blog.aquasec.com/kubernetes-verbs
- https://blog.aquasec.com/kubernetes-rbac
- https://docs.bitnami.com/tutorials/configure-rbac-in-your-kubernetes-cluster/
- https://kubernetes.io/docs/tasks/administer-cluster/kubeadm/kubeadm-certs/
That’s it! PLEASE SHARE 🙏🏼
These tutorials take me a long time to make and it would be amazing if you could share them.
Make sure to tag me on Twitter so I can retweet your post 😊